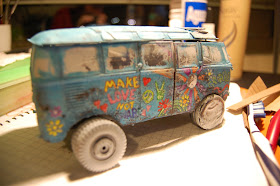
Hi people, here I want to show some work in progress pictures of my Mad Max Competition entry. I have to apologize right in the beginning because the second half of the creation process is not documented with pictures! This is because, in the end I had to organize my move from Chile, enjoy the last common days with my girlfriend and finishing the Groover all at the same time. Thus, there was no time for any pictures unfortunately... However, I think I learned a lot in this first competition I participated (of course just for fun!).
Anyways, enough blabla, now to the pictures:
First, I was thinking a lot about what I want to do and developed a kind of concept for the car. It was also heavily influenced by the availability of plastic kits in Santiago (which was very low!). I gathered lots of ideas, in particular when I was looking trhough my (small) bits box...
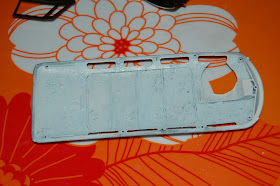
Only, then I started building: First I sprayed a base coat of Chaos black on the parts still in the frame. (At that time I did not know how I would do the outside of the bus. Thus I let it in white (which was a mistake in hindsight ;-)). Then I started assembling the parts. This was very difficult, as every beginning is difficult. I just did not know exactly how I would implement the modifications. But I had to start somewhere, so first: I changed the tiny engine of the T1 to a big block from a really cool military car (Rommel's rod, but that's a different story...)
I changed the driver seat to a much bigger (and hoepfully) more comfortable) one, in fact Rommel's seat! :-)
I wanted wide wheels! I could not find any, thus I just glued pairs of 2 together. For the rear ones I used wheels from a German Amored car (WW II). In addition I slightly lifted the back to give the whole car a more dynamic feel..
And at that point I started already with the painting of the inside. I wanted to try lots of techniques from the Forgeworld Imperial Armour Masterclass book (which is really awesome btw). Here, the first: a dark rusty basecoat of black with scorched brown, then hairspray and salt...
Then a layer of sprayed white (I don't have an airbrush, thus I used on of the GW cans).
And finally a layer of light blue which would be the original interior paint.
I repeated this task for all the interior...
And then my thumb, hot water and a toothbrush to carefully remove the salt and some paint of course. Awesome results for me! And so easy to do!
Next step: I used white spirit and burned umber oil paint to give all details a rusty and dirty shade...
Then I realised that I wanted to do a smiliar effect on the outside... (In hindsight I could/should have done this before assembling the model, because now I had to seal the inside somehow against the spray paint!)
To solve this, I did the following: I took the original window "glass" panes and put some (transparent) tape on them, cut away the overhanging tape and glued them (with very few glue) into their ment to be places... Sorry my English is very bad (I don't have the right vocabulary yet)!
Very early in the building process already I decided that the outside base color should be a light blue (with a little green) to give a nice contrast to all the rusty metallic parts I wanted to add later. I had in mind some awesome Ork models I once saw on CMON, but somehow I could not retrieve them. Anyway, many thanks and credits to all those cool miniature painters out there, who have bluish Ork vehicles!
Ah and of course: I had this idea to do an old hippie car. I liked the idea a lot, to take something that was used as a symbol for peace and harmony to create a brutal post-aüocalyptic beast out of it...
So, this was more or less, how the hippies left the car only with wide wheels and with some paint lost... Now came a really difficult task: Do the post-apocalyptic modifications. Especially, because I had almost no materials back in old Chile. I decided to use cardboard, because it is so easy to manipulate (and not ver sturdy unfortunately).
From here on, I was only painting (and building the roof-top thingy of course. For all the rusty stuff I mainly used a super-simple technique I wil describe later at my Death Guard Marines... In addition, I massively used the Forgeworld powders. I tried to seal everything with the GW stain varnish spray. But somehow it did not really work well. In fact, I really dislike this spray! However, I you ever see the Groover with your own eyes, don't touch it! Otherwise, you will get dirty! ;-)


Showed this to my girlfriend and she loves it! Amazing work!
ReplyDeletehehe, thanks! I am happy that you like it :-)
ReplyDelete