Showing posts with label Terrain. Show all posts

Tuesday, January 7, 2020

Mini Review -- Spiky Brown Tufts from Gamers Grass

Fellow hobbyists,

out of curiosity, I recently bought Spiky Brown Tufts from Gamers Grass:


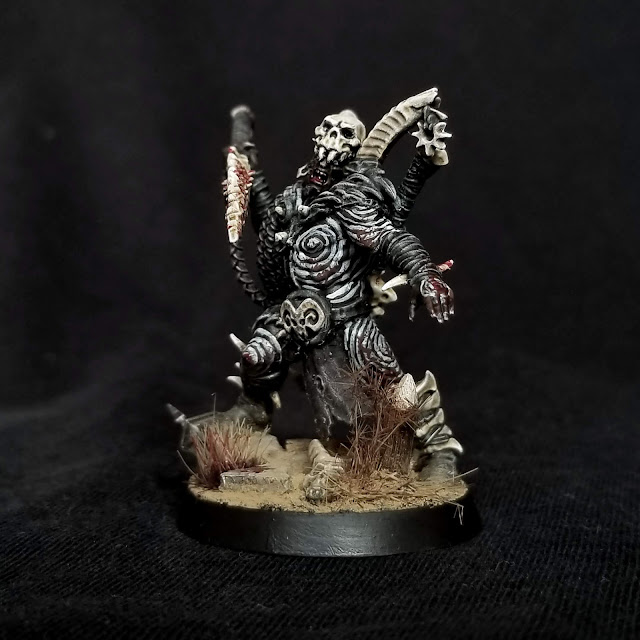
And this is how it looks on the model:

On the right:

On the right:


And on the left:


Pretty neat effect I would say! And easy to apply with its sticky bottom.

Cutting the tufts makes them fall apart completely very easily so careful with this.

All together, very happy with this product! Can recommend. Cheers!

Sunday, December 29, 2019

Imperial and Heretic Statues from Kromlech -- Quick Review

Howdy,

I recently bought my first stuff from Kromlech: the Imperial Statue, the heretic Chaos Space Marine statue, and the corresponding pedestals:


I was impressed by the size and quality for such a good price! The imperial one even comes with 4 different helmets! I can honestly recommend those for your Imperial (or heretical) city world!

Saturday, November 16, 2019

Unboxing Necromunda Dark Uprising

Hi all,

This morning punctual as usual the postman brought me this little early Christmas gift:


GW did not lie, the box is huge! Here comparison with the previous Necromunda core box:

And the box is full to the rim with sprues!

These are the terrain frames:

In particular, there are six types of the new Zona Mortalis sprues

The great news: these frames are the full quality GW (not the quality of those produced in China)!!!

 So there is this frame x6:

The others are all 2x:


The last frame which is for the doors is there only once:

Then, there are the miniatures of course:
3x the corpse grinder cult frame
2x the new subjugator enforcer frame
1x the "old" palantine enforcer frame

Here the new frames: Corpse Grinder Cult

There are many cool heads in the above frame.


The Subjugators:

Here the other things in the box:

Part of it is a two-sided playing matt. It is not made out of cardboard as previously but out of some flexible plastic.

More details will follow!

Cheers!

Monday, August 20, 2018

New bulkheads and barricades for the underhive

Since, I saw the new Necromunda terrain pieces, I had the strong urge to get my fingers dirty on them. And dirty they got indeed :-))) Well mostly, because I decided to reactive my airbrush after a year of hiatus or so. But see for yourself:


OK, first I had some excessive workout with all my favorite hobby tools (Dremel, Clipper, and friends), before glueing on some ultra-fine sand (to simulate large scale rust), and finally attaching some pieces of cardboard for better handling during the airbrushing...


After a good black priming, they were ready for a paint session with first some Scorched Brown and Boltgun Metal airbrushing that then was followed up with my favorite colour (Bestial Brown) applied thinned and generously (as an ink). For rust I always take Blazing Orange. Finally some little detail work and Boltgun highlighting and that's it:


The painting took all in all 5 hours. Roughly twice as long as I thought so the session went on quite a bit into the night. But I had to finish them for an upcoming game. So that's why there was no time to go fancy with hazard stripes, real graffiti and so on. But hey, I have another set of those lying around and these will be done properly... ;-)

Until then, keep the brushes tight!

Sunday, March 23, 2014

More from the treasure box & a first application of the airbrush -- Simple classic ruins

Hi,

apart from many cool bits and miniatures, there were also six of these plastic ruins from the old 3rd edition Warhammer 40k box... I always like these corners, they are so fourtykay! Since my friend lacks terrain pieces for his gaming table to be created and I was eager to try out my new airbrush on some tabletop stuff, I decided to make some super-quick and simple terrain pieces out of them.

Some minutes of gluing later, I was ready to apply my special micture of black paint, white glue, sand and pieces...

I cut some "


The good thing about adding the black paint to the mixture is that the terrain pieces are already primed in black after everything dried.

So I applied some grey paint with the airbrush on the next day. Since GW colors are sooo expensive, I decided to use these cheap acrylic paints I got in a super market. Only disadvantage, you have to water them down a lot before you can put them into the airbrush.

After the gey, I added some brown to make the ground look more interesting...

Next, were some light-grey highlights on the walls and big stones. I added some yellow into the mix to again make everything more interesting...

Finally, the ruins still looked a bit boring to me. Thus, I decided to take some green (mixed with brown) and airbrush the shadowy parts of the walls with it. So unknown reasons it comes out waaay too much in the picture below! The effect is much more subtle in reality!

After the airbrushing, the ruins looked decent but they lacked "depth". This naturally results from the airbrushing itself, i.e. there are no highlighted edges and darkened corners. But this can easily be achieved with a conventional brush:

1. washing the walls with very much thinned black

2. Drybrushing with un-thinned white

Here are the finished classical ruins on the day. Unfortunately, the colors in the following pics are weird. Sorry for that!


So in the end, the airbrushing took longer than I expected (a few hours) but it was a lot of fun, in particular because, different to a normal paint brush, it was very easy to paint the many difficult-to-reach spots. This way, one can concentrate on building up nice color transitions...

Cheers!