Sunday, May 28, 2023

Rebasing Wings of Glory Airplanes to extendable magnetic poles


 Hi Fellas,

something slightly different this time: Since a year of so, I am collecting and playing Wings of Glory from Ares Games. So far, I have only played WWI but I think it is a fantastic game in particular with many people (everyone controlling one plane)!

I saw a video about this game at the Youtube Channel of Little Wars: https://www.youtube.com/watch?v=2mjTCb2CArk&t=1297s
and I was amazed how cool and immersive the game looked in that video! So I had to do the same!

Here is what I did to rebase the Wings of Glory Airplanes onto extendable magnetic poles. It turns out quite simple!

Materials:
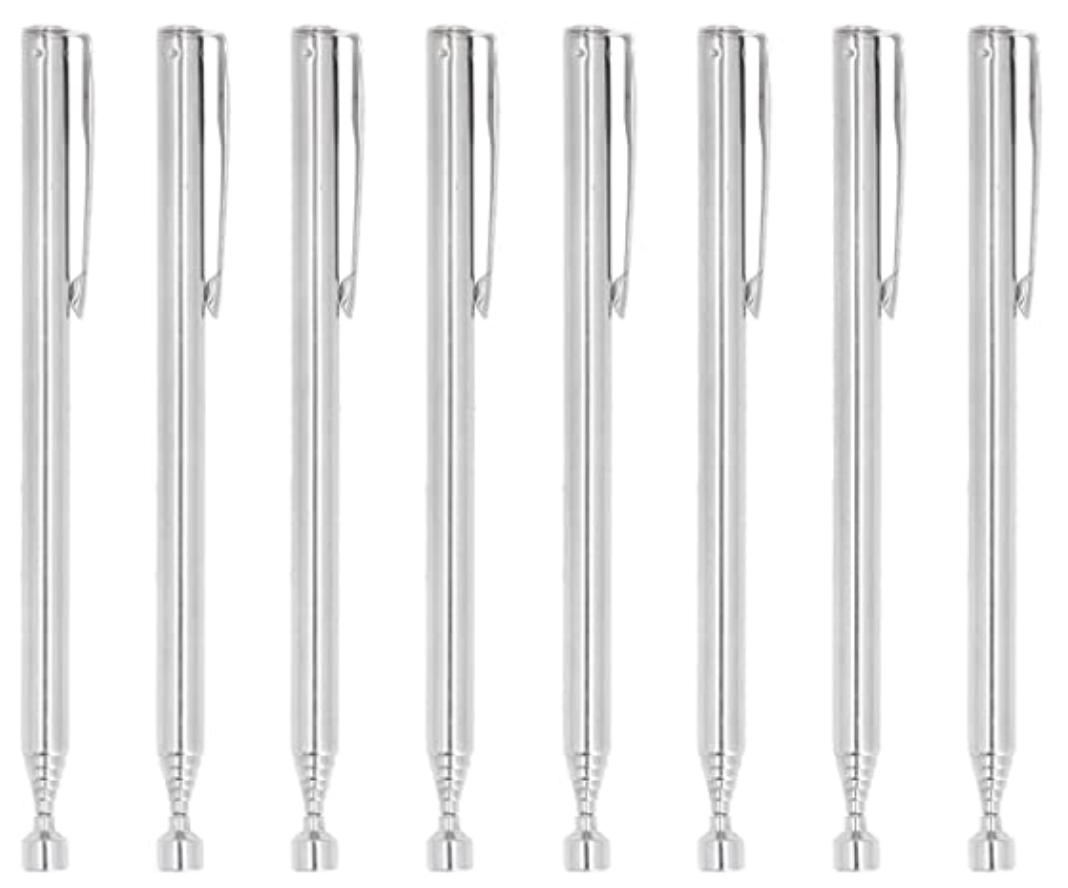
- telescopic magnetic pickup tools, e.g., https://www.amazon.de/dp/B0BNT3BXY7?psc=1&ref=ppx_yo2ov_dt_b_product_details&language=en_GB

- Neodym ring magnets Ø diameter 6mm, thickness: 2mm,  hole diameter: 2 mm  

(There are also magnets with spherical holes, i.e., ball-shaped but they are much more expensive).

- 5mm steel balls (e.g., paint pot mixing balls from AK Interactive)

- OPTIONAL: heavy washers with at least 6mm diameter holes and max 4cm diameter for the small bases. 


Tools:
- electric drill/dremel
- cutter
- small drill bit (e.g. 2 or 3mm)
- round/ball sanding bit
- sanding paper 
- super glue

Step-by-Step:

- Plane:


Not shown above: sanding the steel ball to have a rougher surface texture helps with the gluing and the stability of the positioning later on the base!

- Base (shown for a different plane, apologies!):


Now one just needs to stick the Ring magnet on top and optionally a washer at the bottom for more stability and its done!


One more thing: you can get even more stability for the plane positioning if you sand the inner edges of the ring magnet like this:

This is a bit difficult because the magnet is very hard and becomes very hot very quickly from the friction. Thus a word of warning: Neodym magnets loose their power if the become too hot (ca 80° C), so do not overdo it!

Happy flying!

P.S.: A nice side-effect is the easy storage of the planes on a steel tray: 


Thursday, April 6, 2023

Building your own life-sized Bolter!


Fellow Servants of the Emperor!

You surely agree that the holy Bolter is the appropriate Tool to spread the word of the Emperor among the stars. 

I recently visited a styrodur (hard foam, XPS) crafting workshop held in Hamburg by Gerard Boom aka GeBoom from Shifting Lands, which allowed me to fulfill a long standing dream: building my own bolter!


Gerard is a fantastic person and a great tutor especially for working with hard foam, of which he does not only know all the tricks but is also freely sharing them! I can honestly recommend attending his workshops. You will be able to work on a project of your choice and get Gerard's advice on it! Also, check out his online shop where he is selling great tools (which I could all try at the workshop for free) and even a book for building tabletop terrain with hard foam. 

So I had two days to build a bolter. First I cut several parts with a hot wire cutter:


Things coming together:

The ammo clip still missing:


And the muzzle of course! No problem thanks to Gerard's circular cutting tool:


End of day 1: Everything glued together:


Day 2: Detailing:


A comparison to the original:


At the end of the workshop the build was done: 

If you look closely, you can see the evidence of my poor first attempts at cutting hard foam with the hot wire cutter, especially at the hand guard. 

But nothing that can not be fixed with some filler at home:

After carful sanding, the bolter was ready for paint:


Base paints done:

And now to the fun part: aging!

And, here the final result:


For the Emperor!

Thanks GeBoom!